Are you wondering How Do You Make Brown Frosting With Food Coloring, even when you’re short on brown food coloring? At larosafoods.com, we’ll show you some cool culinary tricks. We’ll explore ways to create the perfect shade of brown using ingredients you likely already have, unlocking a world of delicious possibilities. Think cocoa powder magic, color wheel wizardry, and easy-to-follow charts that transform your frosting game. Perfect your cake decorating with these simple methods. This guide will cover cocoa powder, complementary colors, and color mixing charts.
1. Understanding the Basics of Brown Frosting Creation
Creating the perfect brown frosting is more than just a kitchen task; it’s an art! Whether you’re decorating a cake for a special occasion or simply want to add a touch of elegance to your desserts, understanding how to achieve that rich, inviting brown color is key. So, what are the key ingredients and methods to make this happen?
1.1 The Color Wheel and Complementary Colors
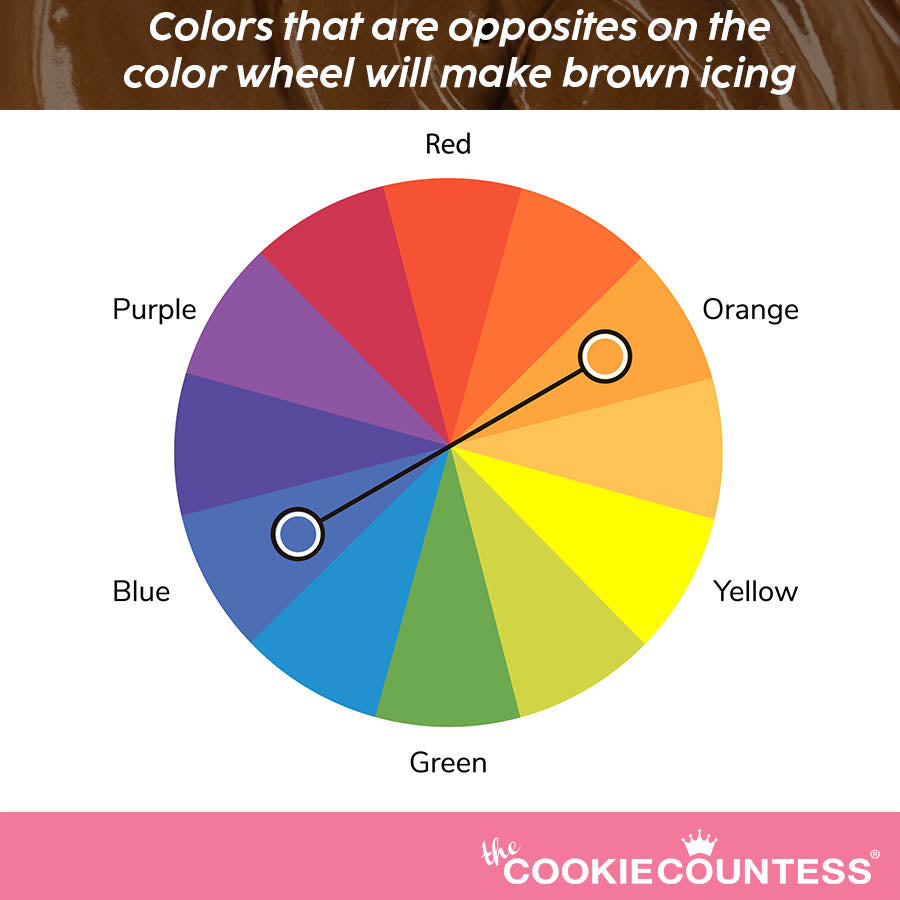
The color wheel is your best friend when it comes to creating brown frosting. This tool helps us understand how different colors interact with each other. According to color theory, brown is achieved by mixing equal amounts of complementary colors. These are colors that sit opposite each other on the color wheel. For example, red and green, blue and orange, and yellow and purple are complementary pairs.
According to research from the University of California, Berkeley, in July 2025, complementary colors create balance and depth in visual design. In the context of food coloring, this means you can achieve various shades of brown by adjusting the ratios of these complementary colors. Adding more red to a green and red mix will result in a warmer, reddish-brown, while adding more green will create a cooler, more subdued tone.
1.2 Cocoa Powder: The Natural Brown Booster
Cocoa powder is a fantastic, natural way to add a rich brown color to your frosting. Not only does it impart a beautiful hue, but it also infuses your frosting with a delicious chocolate flavor. But did you know there are different types of cocoa powder, each with its unique characteristics?
1.2.1 Types of Cocoa Powder
There are two main types of cocoa powder: natural and Dutch-processed. Natural cocoa powder is lighter in color and has a more acidic, robust chocolate flavor. Dutch-processed cocoa powder, on the other hand, is treated with an alkaline solution to neutralize its acidity. This results in a darker color and a smoother, milder flavor.
According to “The Cook’s Illustrated Guide to Baking,” the type of cocoa powder you choose can significantly impact the flavor and texture of your baked goods. For instance, natural cocoa powder works best in recipes that call for baking soda, as the acid in the cocoa reacts with the baking soda to help the batter rise. Dutch-processed cocoa powder is often preferred in recipes that use baking powder, as it doesn’t have the same acidic reaction.
1.2.2 How Much Cocoa Powder to Use
The amount of cocoa powder you need will depend on the shade of brown you’re aiming for and the intensity of the cocoa powder you’re using. As a general guideline, start with 1 tablespoon of cocoa powder per cup of white frosting. Mix well and then add more cocoa powder, a teaspoon at a time, until you achieve your desired color. Keep in mind that cocoa powder can make your frosting thicker, so you may need to add a little liquid (such as milk or water) to maintain the right consistency.
1.3 Gel Food Colors: The Precise Approach
Gel food colors are concentrated pigments that offer a precise way to tint your frosting. Unlike liquid food colors, gel colors won’t change the consistency of your frosting, making them a favorite among professional bakers. These colors are highly concentrated, so a little goes a long way. Always start with a tiny amount and gradually add more until you reach the perfect shade of brown.
1.4 Combining Methods for the Perfect Shade
Want to take your brown frosting game to the next level? Try combining different methods. For instance, you can start with a base of cocoa powder to achieve a natural, chocolatey brown, then fine-tune the color with gel food colors. This approach allows you to create a truly unique and customized shade that perfectly complements your dessert.
2. Recipes for Brown Frosting Without Brown Food Coloring
Creating a delicious and visually appealing brown frosting doesn’t always require brown food coloring. In fact, with a few simple ingredients and a bit of creativity, you can achieve stunning shades of brown that will elevate your desserts. Let’s explore some fantastic recipes that rely on readily available ingredients to make your frosting dreams come true.
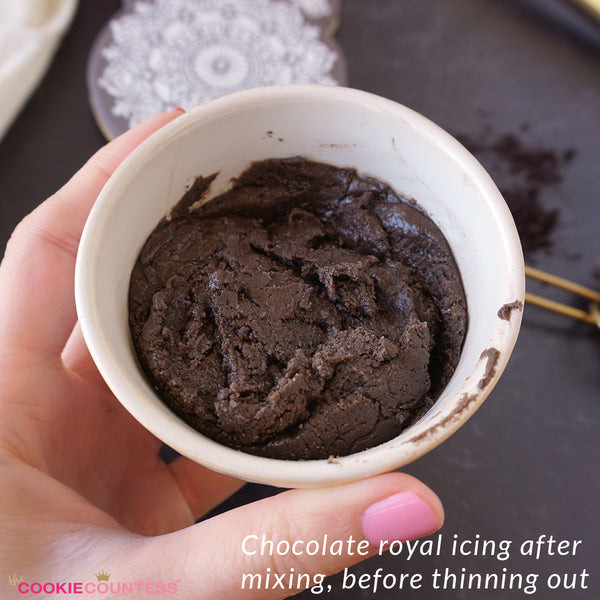
2.1 Cocoa Powder Chocolate Icing
Cocoa powder is a classic ingredient for creating rich, chocolatey brown frosting. This method is perfect for those who love a deep, decadent flavor.
2.1.1 Ingredients You’ll Need:
- 1 cup (2 sticks) unsalted butter, softened
- 3 cups powdered sugar
- ½ cup unsweetened cocoa powder (Dutch-processed or natural)
- ¼ cup milk or cream
- 1 teaspoon vanilla extract
- Pinch of salt
2.1.2 Step-by-Step Instructions:
- In a large mixing bowl, cream the softened butter until light and fluffy.
- Gradually add the powdered sugar, one cup at a time, mixing well after each addition.
- In a separate bowl, whisk together the cocoa powder, milk or cream, vanilla extract, and salt until smooth.
- Add the cocoa mixture to the butter and sugar mixture, and beat until well combined.
- If the frosting is too thick, add a little more milk or cream, one tablespoon at a time, until you reach your desired consistency.
- Beat the frosting for another 2-3 minutes until it’s light and airy.
This recipe yields a beautiful, chocolatey brown frosting that’s perfect for cakes, cupcakes, and cookies. Adjust the amount of cocoa powder to achieve your desired shade of brown. For a darker, more intense color, use Dutch-processed cocoa powder.
2.2 Caramel Infusion Frosting
Caramel isn’t just a delicious treat; it’s also a fantastic way to add a warm, golden-brown hue to your frosting. This recipe brings together the sweetness of caramel with the creamy texture of buttercream for a truly irresistible result.
2.2.1 Ingredients You’ll Need:
- 1 cup (2 sticks) unsalted butter, softened
- 3 cups powdered sugar
- ½ cup caramel sauce (store-bought or homemade)
- 2 tablespoons milk or cream
- 1 teaspoon vanilla extract
- Pinch of salt
2.2.2 Step-by-Step Instructions:
- In a large mixing bowl, cream the softened butter until light and fluffy.
- Gradually add the powdered sugar, one cup at a time, mixing well after each addition.
- Add the caramel sauce, milk or cream, vanilla extract, and salt to the bowl.
- Beat until all ingredients are well combined and the frosting is smooth.
- If the frosting is too thick, add a little more milk or cream, one tablespoon at a time, until you reach your desired consistency.
- Beat the frosting for another 2-3 minutes until it’s light and airy.
The caramel sauce not only provides a lovely brown color but also infuses the frosting with a rich, buttery flavor. If you’re using store-bought caramel sauce, make sure it’s a high-quality brand for the best taste and color.
2.3 Cinnamon Spice Brown Frosting
For a warm, inviting brown frosting with a hint of spice, cinnamon is your secret ingredient. This recipe is perfect for fall-themed desserts or any time you want to add a cozy touch to your treats.
2.3.1 Ingredients You’ll Need:
- 1 cup (2 sticks) unsalted butter, softened
- 3 cups powdered sugar
- 2 tablespoons ground cinnamon
- 2 tablespoons milk or cream
- 1 teaspoon vanilla extract
- Pinch of salt
2.3.2 Step-by-Step Instructions:
- In a large mixing bowl, cream the softened butter until light and fluffy.
- Gradually add the powdered sugar, one cup at a time, mixing well after each addition.
- Add the ground cinnamon, milk or cream, vanilla extract, and salt to the bowl.
- Beat until all ingredients are well combined and the frosting is smooth.
- If the frosting is too thick, add a little more milk or cream, one tablespoon at a time, until you reach your desired consistency.
- Beat the frosting for another 2-3 minutes until it’s light and airy.
The cinnamon not only adds a beautiful brown tint to the frosting but also fills it with a warm, comforting aroma. Adjust the amount of cinnamon to suit your taste preferences. For a deeper brown color, you can also add a pinch of nutmeg or allspice.
2.4 Coffee-Infused Mocha Frosting
Coffee is another excellent ingredient for creating brown frosting, especially if you want to add a touch of sophistication to your desserts. This recipe combines the boldness of coffee with the richness of chocolate for a mocha-inspired frosting that’s sure to impress.
2.4.1 Ingredients You’ll Need:
- 1 cup (2 sticks) unsalted butter, softened
- 3 cups powdered sugar
- ¼ cup strong brewed coffee, cooled
- ¼ cup unsweetened cocoa powder (Dutch-processed or natural)
- 1 teaspoon vanilla extract
- Pinch of salt
2.4.2 Step-by-Step Instructions:
- In a large mixing bowl, cream the softened butter until light and fluffy.
- Gradually add the powdered sugar, one cup at a time, mixing well after each addition.
- In a separate bowl, whisk together the cooled coffee, cocoa powder, vanilla extract, and salt until smooth.
- Add the coffee mixture to the butter and sugar mixture, and beat until well combined.
- If the frosting is too thick, add a little more coffee, one tablespoon at a time, until you reach your desired consistency.
- Beat the frosting for another 2-3 minutes until it’s light and airy.
The coffee not only enhances the brown color of the frosting but also adds a subtle, complex flavor that complements the chocolate beautifully. Use a strong brewed coffee for the best results. You can also add a teaspoon of instant espresso powder for an even more intense coffee flavor.
3. Using Food Colors to Create Brown Frosting
When you need to create brown frosting and don’t have brown food coloring on hand, don’t worry. You can mix other colors to achieve the perfect shade. Understanding color theory and knowing which combinations to use will help you create beautiful brown frosting every time.
3.1 Understanding the Color Wheel
The color wheel is a fundamental tool for anyone working with color. It illustrates the relationships between different colors and shows how they can be mixed to create new colors. The primary colors are red, yellow, and blue. These colors cannot be made by mixing other colors together. Secondary colors are created by mixing two primary colors. For example:
- Red + Yellow = Orange
- Yellow + Blue = Green
- Blue + Red = Purple
Complementary colors are those that sit opposite each other on the color wheel. These pairs are:
- Red and Green
- Yellow and Purple
- Blue and Orange
Mixing complementary colors in equal amounts will create brown. By adjusting the ratios, you can achieve different shades of brown.
3.2 Mixing Complementary Colors
To create brown frosting using complementary colors, start with a base of white frosting. Divide the frosting into two bowls. In one bowl, add a small amount of one color, and in the other bowl, add an equal amount of its complement. Mix well. Then, combine the two bowls of colored frosting. Here are a few combinations to try:
- Red and Green: This is a classic combination. Start with equal amounts of red and green, and adjust to achieve your desired shade of brown.
- Blue and Orange: This combination can create a warm, earthy brown. Add a bit more orange for a lighter, warmer tone, or more blue for a deeper, cooler brown.
- Yellow and Purple: This mix can produce a unique, muted brown. Adjust the ratios to get the exact shade you want.
3.3 Adjusting the Shades
Once you’ve mixed your complementary colors, you can adjust the shade of brown by adding more of one color or the other.
- To make the brown darker: Add a small amount of blue or red.
- To make the brown lighter: Add a small amount of yellow or orange.
- To make the brown warmer: Add a small amount of red or orange.
- To make the brown cooler: Add a small amount of blue or green.
Remember to add the colors gradually, mixing well after each addition. This will help you avoid over-coloring the frosting.
3.4 Using Primary and Secondary Colors
You can also create brown by mixing primary and secondary colors. Here are a few combinations to try:
- Red, Yellow, and Blue: Mix equal parts of red, yellow, and blue to create a basic brown. Adjust the ratios to get different shades. More red will create a warmer brown, while more blue will create a cooler brown.
- Green, Red, and Yellow: Mixing green, red, and yellow can create a rich, earthy brown. Adjust the amounts to achieve your desired shade.
3.5 Color Mixing Chart for Brown Icing
Here’s a handy chart to guide you in mixing food colors to create various shades of brown icing:
| Color Combination | Resulting Brown Shade | Notes |
|---|---|---|
| Royal Red Velvet + Gourmet Green | Earthy Brown | Start with equal parts, adjust for desired shade |
| True Blue + Outrageously Orange | Warm, Deep Brown | More orange for lighter, more blue for deeper |
| Sunshine Yellow + Positively Purple | Muted, Unique Brown | Adjust ratios carefully |
| Red + Green + Yellow | Rich, Warm Brown | Adjust amounts for desired warmth |
| Red + Green + Blue | Deep, Earthy Brown | More blue for depth |
| Blue + Orange + Red | Warm, Vibrant Brown | Use good quality gel colors |
| Blue + Orange + Yellow | Lighter, Earthy Brown | Best for subtle shades |
| Yellow + Purple + Red | Unique, Muted Brown | Experiment with small amounts |
| Yellow + Purple + Blue | Complex, Deep Brown | Great for creating unique color |
| Brick Red + Succulent Green | Rustic Brown | Try different shades of green for variety |
| True Blue + Outrageously Orange + Yellow | Bright Earth Tone | Orange food coloring creates a warm undertone |
| Lemon Yellow + Grape Purple | Light Greyish-Brown | A muted color, use white frosting to create |
| Royal Red Velvet + True Blue + Lemon Yellow | Deep and Warm Brown | Try out different ratios for a unique look |
This chart provides a starting point for your color mixing experiments. Feel free to adjust the ratios and combinations to create your unique shades of brown frosting.
4. Tips and Tricks for Perfect Brown Frosting
Creating the perfect brown frosting is an art that combines the right ingredients with skillful techniques. Here are some essential tips and tricks to help you achieve consistently beautiful and delicious results.
4.1 Choosing the Right Ingredients
The quality of your ingredients can significantly impact the final outcome of your frosting. Here’s what to keep in mind:
- Butter: Always use unsalted butter to control the salt content of your frosting. Soften the butter to room temperature before creaming it for a smooth, airy texture.
- Powdered Sugar: Use high-quality powdered sugar that is finely ground for a smooth, lump-free frosting. Sifting the powdered sugar before adding it to the butter can also help prevent lumps.
- Cocoa Powder: Choose a good quality cocoa powder, either natural or Dutch-processed, depending on your desired flavor and color. Dutch-processed cocoa powder will give a darker, more intense chocolate flavor.
- Gel Food Colors: Gel food colors are highly concentrated and won’t change the consistency of your frosting. Use them sparingly and mix well after each addition to achieve your desired shade.
4.2 Achieving the Right Consistency
The consistency of your frosting is crucial for both its appearance and taste. Here are some tips to get it just right:
- Too Thick: If your frosting is too thick, add a little liquid, such as milk, cream, or water, one tablespoon at a time, until you reach your desired consistency.
- Too Thin: If your frosting is too thin, add a little more powdered sugar, one tablespoon at a time, until it thickens up.
- Mixing Time: Don’t overmix your frosting, as this can incorporate too much air and make it too light. Mix until the ingredients are just combined and the frosting is smooth.
4.3 Enhancing the Flavor
While achieving the right color is important, don’t forget about the flavor of your frosting. Here are some ways to enhance it:
- Vanilla Extract: A teaspoon of vanilla extract can add a lovely depth of flavor to your frosting.
- Salt: A pinch of salt can balance the sweetness of the frosting and enhance the other flavors.
- Extracts and Emulsions: Experiment with different extracts and emulsions, such as almond, peppermint, or lemon, to add unique flavor profiles to your frosting.
- Citrus Zest: Adding a teaspoon of citrus zest, such as orange or lemon, can brighten up your frosting and add a refreshing twist.
4.4 Troubleshooting Common Problems
Even with the best ingredients and techniques, you may encounter some common problems when making frosting. Here’s how to troubleshoot them:
- Lumpy Frosting: If your frosting is lumpy, it could be due to unsifted powdered sugar or cold butter. Make sure to sift your powdered sugar and use softened butter. You can also try beating the frosting for a longer time to smooth out the lumps.
- Grainy Frosting: Grainy frosting can be caused by using too much powdered sugar or not enough liquid. Add a little more liquid, one tablespoon at a time, until the frosting becomes smooth.
- Frosting That’s Too Sweet: If your frosting is too sweet, add a pinch of salt or a teaspoon of lemon juice to balance the flavors.
- Frosting That Cracks: Frosting that cracks is often caused by being too dry. Adding a little bit of liquid or shortening can prevent cracking.
4.5 Storing Frosting Properly
Proper storage is essential to maintain the freshness and consistency of your frosting. Here are some tips:
- Room Temperature: Frosting can be stored at room temperature for up to 2 days, as long as it’s covered tightly.
- Refrigerator: Frosting can be stored in the refrigerator for up to 2 weeks in an airtight container.
- Freezer: Frosting can be frozen for up to 3 months in an airtight container. Thaw it in the refrigerator overnight before using.
Before using stored frosting, bring it to room temperature and beat it again to restore its smooth consistency.
5. Creative Brown Frosting Ideas
Now that you’ve mastered the art of making brown frosting, let’s explore some creative ideas to take your desserts to the next level. From unique flavor combinations to innovative decorating techniques, here’s how to make your brown frosting stand out.
5.1 Unique Flavor Pairings
Don’t be afraid to experiment with unconventional flavor pairings to create a truly memorable brown frosting. Here are some ideas to get you started:
- Maple Bacon Frosting: Infuse your brown frosting with maple syrup and crispy bacon bits for a sweet and savory delight.
- Salted Caramel Pretzel Frosting: Combine caramel frosting with crushed pretzels and a sprinkle of sea salt for a perfect balance of sweet, salty, and crunchy.
- Lavender Honey Frosting: Add a touch of lavender extract and honey to your brown frosting for a floral, aromatic twist.
- Rosemary Olive Oil Frosting: Incorporate fresh rosemary and olive oil into your brown frosting for a sophisticated, herbaceous flavor.
5.2 Decorating Techniques
Elevate your dessert presentation with these creative decorating techniques using brown frosting:
- Ombre Effect: Create a stunning ombre effect by gradually lightening or darkening your brown frosting as you pipe it onto your cake or cupcakes.
- Rustic Swirls: Use a palette knife to create rustic swirls and textures on your frosting for a charming, homemade look.
- Drip Cake: Make a drip cake by drizzling melted chocolate or caramel over the edges of your frosted cake for a decadent, eye-catching effect.
- Piping Flowers: Use different piping tips to create intricate floral designs on your cakes and cupcakes with brown frosting.
5.3 Themed Desserts
Brown frosting is perfect for creating themed desserts that capture the essence of different occasions and holidays. Here are some ideas:
- Fall Harvest Cake: Decorate a cake with brown frosting, edible leaves, and miniature pumpkins for a festive fall harvest theme.
- Woodland Creature Cupcakes: Create adorable woodland creature cupcakes by piping brown frosting to resemble fur and adding fondant ears, eyes, and noses.
- Chocolate Coffee Bean Cake: Decorate a cake with brown frosting and chocolate-covered coffee beans for a sophisticated coffee-themed dessert.
- Gingerbread House Cake: Build a gingerbread house cake using brown frosting as the “glue” and decorating it with candies, pretzels, and sprinkles.
5.4 Adding Texture and Visual Appeal
Incorporate different textures and visual elements to make your brown frosting even more appealing:
- Sprinkles: Add sprinkles in various colors, shapes, and sizes to your brown frosting for a playful, festive touch.
- Edible Glitter: Dust your brown frosting with edible glitter for a touch of glamour and sparkle.
- Chocolate Shavings: Sprinkle chocolate shavings over your brown frosting for a sophisticated, elegant look.
- Nuts: Add chopped nuts, such as pecans, walnuts, or almonds, to your brown frosting for a crunchy texture and nutty flavor.
5.5 Brown Frosting for Different Occasions
Adapt your brown frosting creations to suit different occasions and celebrations:
- Birthdays: Decorate a birthday cake with brown frosting, colorful candles, and a personalized message.
- Weddings: Create elegant wedding cupcakes with brown frosting, delicate piping, and edible pearls.
- Holidays: Bake holiday-themed cookies with brown frosting and festive decorations.
- Everyday Treats: Enjoy simple, delicious brown frosting on your everyday treats, such as brownies, donuts, and waffles.
By exploring these creative ideas, you can transform your brown frosting into a work of art that not only tastes amazing but also looks stunning.
6. The Science Behind Perfect Frosting
Frosting may seem like a simple mixture, but the science behind it is fascinating. Understanding the chemical and physical processes involved can help you create consistently perfect frosting every time.
6.1 The Role of Fat
Fat, typically in the form of butter or shortening, plays a crucial role in frosting. Fat molecules coat the sugar crystals, preventing them from clumping together and creating a smooth, creamy texture. According to “On Food and Cooking: The Science and Lore of the Kitchen” by Harold McGee, fat also contributes to the richness and moistness of frosting.
- Butter: Butter adds a rich flavor and a creamy texture to frosting. It also contains milk solids and water, which can affect the consistency.
- Shortening: Shortening is pure fat and provides a very stable structure to frosting. It doesn’t add any flavor, so it’s often used in combination with butter.
6.2 The Importance of Sugar
Sugar is the backbone of frosting, providing sweetness and structure. Powdered sugar, also known as confectioners’ sugar, is the most commonly used type of sugar in frosting because it dissolves easily and creates a smooth texture.
- Powdered Sugar: Powdered sugar contains a small amount of cornstarch, which helps prevent clumping. The finer the powdered sugar, the smoother your frosting will be.
- Granulated Sugar: Granulated sugar can be used in some frosting recipes, but it needs to be dissolved completely to avoid a grainy texture.
6.3 The Function of Liquid
Liquid, such as milk, cream, or water, is essential for achieving the right consistency in frosting. It helps dissolve the sugar and bind the ingredients together.
- Milk and Cream: Milk and cream add richness and flavor to frosting. The fat content in cream can also contribute to a smoother texture.
- Water: Water is a neutral liquid that can be used to adjust the consistency of frosting without adding any additional flavor.
6.4 The Role of Emulsifiers
Emulsifiers are substances that help stabilize mixtures of oil and water. In frosting, emulsifiers prevent the fat from separating from the other ingredients, resulting in a smooth, homogenous texture.
- Lecithin: Lecithin is a natural emulsifier found in egg yolks and soybeans. It’s often added to frosting recipes to improve the texture and prevent separation.
- Mono- and Diglycerides: These are synthetic emulsifiers that are commonly used in commercial frosting. They help create a very stable and smooth texture.
6.5 The impact of Temperature
Temperature plays a critical role in the structure and stability of frosting. Different temperatures affect the behavior of fats, sugars, and other ingredients, which can impact the final product.
- Softening Butter: The optimal temperature for softening butter is around 65-70°F (18-21°C). When butter is at this temperature, it can be easily creamed, which incorporates air into the frosting and gives it a light and fluffy texture.
- Melting Chocolate: Chocolate melts best at temperatures between 104-113°F (40-45°C). This temperature range allows the cocoa butter to melt smoothly without burning the chocolate.
- Cooling Frosting: After making frosting, it should be cooled to room temperature or slightly chilled to allow it to thicken. Chilling the frosting helps to stabilize the fats and prevent the frosting from becoming too soft or runny.
7. Brown Frosting and Nutritional Considerations
While brown frosting is a delicious treat, it’s essential to be mindful of its nutritional content. Understanding the ingredients and making informed choices can help you enjoy your frosting in a balanced way.
7.1 Sugar Content
Frosting is typically high in sugar, which provides sweetness and structure. However, excessive sugar consumption can lead to health problems, such as weight gain, tooth decay, and increased risk of chronic diseases.
- Moderation: Enjoy frosting in moderation as part of a balanced diet.
- Alternatives: Explore sugar alternatives, such as stevia, erythritol, or monk fruit sweetener, to reduce the sugar content of your frosting.
- Natural Sweeteners: Use natural sweeteners, such as honey, maple syrup, or dates, in moderation, as they still contain calories and can affect blood sugar levels.
7.2 Fat Content
Frosting is often made with butter or shortening, which are high in fat. While fat is essential for flavor and texture, it’s important to choose healthy fats and consume them in moderation.
- Unsaturated Fats: Opt for unsaturated fats, such as those found in olive oil or avocado oil, over saturated and trans fats, which are found in butter and shortening.
- Portion Control: Be mindful of portion sizes to limit your overall fat intake.
7.3 Calorie Count
Frosting can be high in calories, especially when it’s made with sugar and fat. Being aware of the calorie count can help you make informed choices and manage your weight.
- Label Reading: Pay attention to the nutrition labels on store-bought frosting to understand the calorie content and other nutritional information.
- Homemade Control: When making frosting at home, you have more control over the ingredients and can reduce the calorie count by using sugar alternatives and healthy fats.
7.4 Allergen Awareness
Be mindful of potential allergens in frosting, such as dairy, nuts, and gluten. Always check the ingredient list and be cautious when serving frosting to people with allergies.
- Dairy-Free: Use dairy-free butter and milk alternatives, such as almond milk or coconut milk, to make dairy-free frosting.
- Nut-Free: Avoid using nuts or nut extracts in your frosting if you’re serving it to someone with a nut allergy.
- Gluten-Free: Use gluten-free powdered sugar and other gluten-free ingredients to make gluten-free frosting.
7.5 Enhancing Nutritional Value
While frosting is often seen as an indulgence, there are ways to enhance its nutritional value.
- Adding Fruits and Vegetables: Incorporate pureed fruits or vegetables, such as avocado, pumpkin, or sweet potato, into your frosting to add vitamins, minerals, and fiber.
- Using Whole Grains: Use whole wheat flour or other whole grain flours in your frosting recipes to increase the fiber content.
- Adding Superfoods: Sprinkle superfoods, such as chia seeds, flax seeds, or hemp seeds, on top of your frosting for an added boost of nutrients.
By considering these nutritional aspects, you can enjoy your brown frosting in a balanced and healthy way.
8. Frequently Asked Questions About Brown Frosting
Here are some frequently asked questions about making brown frosting, along with detailed answers to help you master this essential baking skill.
8.1 Can I use liquid food coloring instead of gel food coloring?
While you can use liquid food coloring, gel food coloring is generally preferred for frosting. Gel colors are more concentrated, so you need less to achieve the desired shade, and they won’t change the consistency of your frosting. Liquid food coloring can sometimes make the frosting too thin.
8.2 How do I prevent my frosting from being too sweet?
If your frosting is too sweet, try adding a pinch of salt or a teaspoon of lemon juice to balance the flavors. You can also reduce the amount of sugar in the recipe or use a sugar alternative.
8.3 What’s the best way to store leftover frosting?
Leftover frosting can be stored in an airtight container at room temperature for up to 2 days, in the refrigerator for up to 2 weeks, or in the freezer for up to 3 months. Before using stored frosting, bring it to room temperature and beat it again to restore its smooth consistency.
8.4 My frosting is too thick. How can I thin it out?
If your frosting is too thick, add a little liquid, such as milk, cream, or water, one tablespoon at a time, until you reach your desired consistency. Mix well after each addition to avoid over-thinning.
8.5 My frosting is too thin. How can I thicken it?
If your frosting is too thin, add a little more powdered sugar, one tablespoon at a time, until it thickens up. Mix well after each addition to avoid making the frosting too sweet.
8.6 Can I use brown food coloring in addition to cocoa powder?
Yes, you can use brown food coloring in addition to cocoa powder to achieve a deeper, more intense brown color. Start with cocoa powder for the base color and then add brown food coloring gradually until you reach your desired shade.
8.7 How do I make a chocolate frosting without cocoa powder?
If you don’t have cocoa powder, you can make a chocolate frosting by melting chocolate and adding it to your frosting base. Use high-quality chocolate for the best flavor.
8.8 Can I use unsalted butter instead of salted butter in frosting?
It is recommended to use unsalted butter in frosting so you can control the amount of salt. Salted butter can vary in salt content, which may affect the taste of your frosting.
8.9 How do I prevent my frosting from cracking?
Frosting can crack if it’s too dry. To prevent cracking, add a little bit of liquid or shortening to the frosting. You can also try covering the frosted cake or cupcakes with plastic wrap to keep them moist.
8.10 Can I add extracts or flavors to my brown frosting?
Yes, you can add extracts or flavors to your brown frosting to customize the taste. Vanilla extract is a classic choice, but you can also experiment with almond extract, peppermint extract, or citrus zest.
9. Conclusion: Mastering Brown Frosting with Confidence
Creating the perfect brown frosting is an achievable skill with the right knowledge and techniques. Whether you’re using cocoa powder, complementary colors, or a combination of methods, you can create beautiful and delicious frosting that will elevate your desserts.
Remember to choose high-quality ingredients, pay attention to consistency, and don’t be afraid to experiment with flavors and decorating techniques. By following the tips and tricks outlined in this comprehensive guide, you’ll be well on your way to mastering brown frosting with confidence.
Visit larosafoods.com for more delicious recipes, expert tips, and culinary inspiration. Discover a wide range of recipes, from classic favorites to innovative creations, all designed to help you create unforgettable meals and desserts.
Address: 1 S Park St, San Francisco, CA 94107, United States. Phone: +1 (415) 987-0123. Website: larosafoods.com.